
Travel insurance claim portal document upload problems can turn a complete evidence file into an apparently incomplete claim. A progress bar, green check, or filename on screen does not always prove that the file was attached to the correct claim, stored completely, readable by the examiner, and accepted as the requested document.
This guide provides a U.S.-focused recovery workflow for size, format, password, page, image-quality, timeout, indexing, duplicate, and receipt failures. Follow the actual administrator’s instructions; portal limits and alternate submission channels vary.
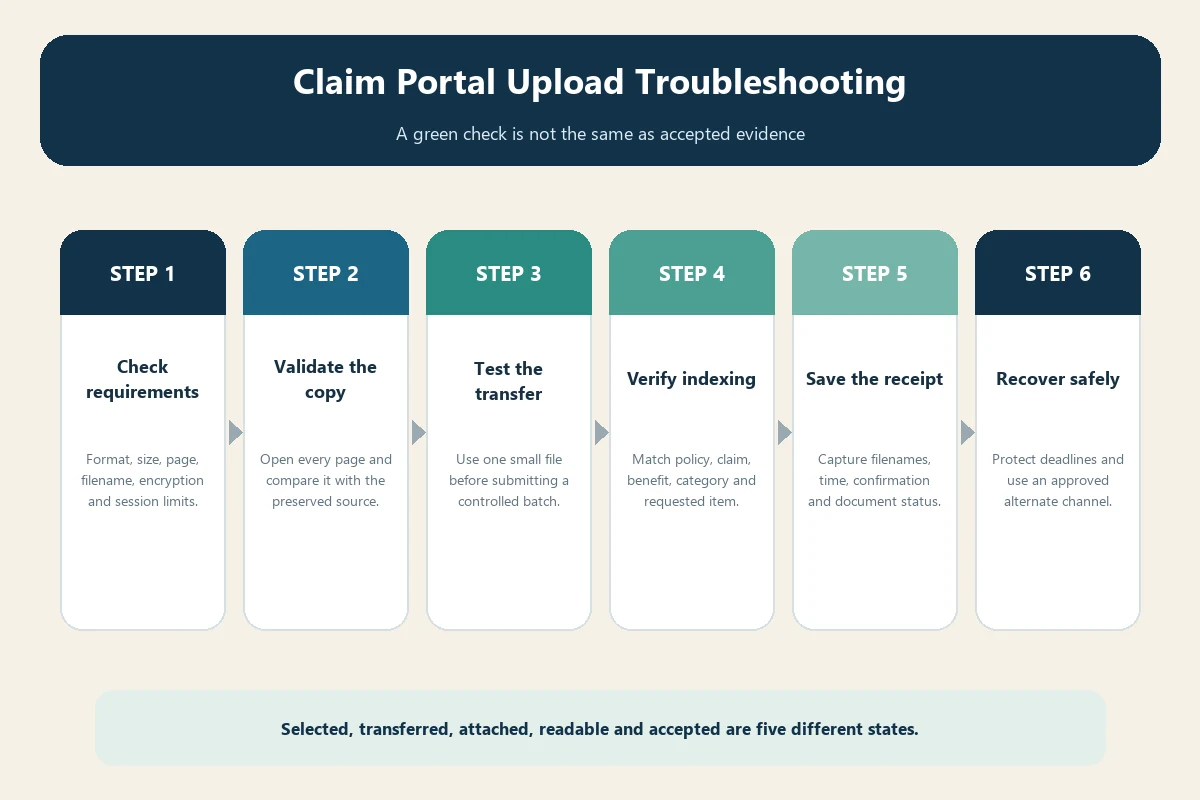
Separate five different upload outcomes
- Selected: the browser displays a local filename.
- Transferred: data finished moving to the portal.
- Attached: the file appears under the intended claim and document type.
- Readable: the stored file opens and its pages are legible.
- Accepted: the examiner considers it responsive to the request.
Do not collapse those states into “uploaded.” Record evidence for each stage.
Protect the deadline before troubleshooting
If notice, proof, appeal, or requested-document time is close, contact the administrator through a verified channel immediately. State that you are attempting submission, identify the claim and requested items, describe the error, attach screenshots without sensitive data where permitted, and request an approved alternative.
Do not assume a technical failure automatically extends a deadline. Use our claim deadline guide and preserve every attempted-submission timestamp.
Read the portal requirements again
Check accepted extensions, per-file and total size, page count, filename characters, encryption, image dimensions, number of simultaneous files, session duration, and whether a document-type dropdown is mandatory. Requirements can differ between initial claim filing and later supplemental uploads.
A current University of California Chubb claim portal guide notes that a 403 Forbidden error can occur during file upload and provides an alternate form-and-email path. Use only the instructions for your own plan and administrator.
Diagnose unsupported file formats
A filename ending in PDF does not prove that the file is a valid PDF. Phones can create HEIC images, scanners can produce TIFF, office apps can embed unsupported content, and renaming an extension does not convert the format.
Export or print a clean copy using trusted software, then reopen it locally. Preserve the original separately. Do not convert a clinical, legal, or official record in a way that removes signatures, seals, metadata needed for authenticity, or page content.
Reduce file size without destroying evidence
Crop empty margins, remove accidental blank pages, scan in grayscale when color is not evidentiary, and use a reasonable resolution that keeps small print readable. Split a large packet at logical boundaries—invoice, clinical record, payment proof, translation—not arbitrary page counts.
Keep the source file unchanged. Compare every compressed or split output with the original, including page count, totals, signatures, barcodes, and back pages. Number parts clearly: hospital-record-part-1-of-3.pdf.
Remove password and permission barriers lawfully
A bank, hospital, or email attachment may open only with a password or block printing. The examiner may not know the password and the portal may reject encrypted files. Obtain an authorized unprotected copy from the issuer or create a permitted working copy.
Never place a document password in a public filename or ordinary email subject. If secure password delivery is required, follow the administrator’s instructions and retain proof that the examiner received both components.
Check every page for readability
Open the final upload copy at normal zoom. Verify orientation, focus, contrast, edges, page order, front and back, date, vendor, traveler or patient, currency, amount, payment status, and identifying number. A thumbnail can hide a blurred total or missing second page.
For receipts and missing originals, use our alternative proof guide. Do not fabricate clarity by retyping an amount onto the image.
Use a controlled filename convention
Prefer short ASCII filenames if the portal is sensitive: claim category, date, issuer, and sequence. Avoid emojis, ampersands, repeated periods, very long names, and characters the portal forbids. Do not put Social Security numbers, diagnoses, full account numbers, or passwords in filenames.
Maintain a separate index mapping each portal filename to the original, requested item, date, amount, and page count.
Test one small file before a large batch
When the system permits, upload one compliant, non-duplicative file and confirm it appears under the correct claim. Then submit additional files in small batches. This isolates a single bad file and reduces the chance that one error rejects the entire set.
The CMS recovery portal help page explains a useful general pattern: if one file triggers an error, none of a selected batch may upload, and the confirmation page should list successful filenames. Your travel portal may behave differently, so verify rather than assume.
Avoid session timeout and browser-state problems
Prepare files before logging in. Use a supported current browser, stable connection, and one active session. Disable neither security controls nor antivirus merely to force an upload. Avoid public Wi-Fi and shared devices for medical, passport, and banking records.
If a session expires, log in again through the official site and check what persisted before resubmitting. A spinning button or blank page is not a receipt.
Capture the error safely
Record date, local time and zone, portal URL domain, claim number, browser and device, step, filename, extension, size, error code, and exact message. Screenshot only the necessary area and redact exposed identifiers before ordinary correspondence.
Do not share browser developer logs or network captures containing tokens, cookies, account data, or document contents unless trusted technical support requests them through a secure process.
Confirm the file reached the correct claim
One traveler can have several claim numbers or benefit lanes. Verify policy, insured, trip, incident, benefit, and document category. A medical bill attached to a baggage claim can be technically stored but operationally missing.
Download the submission summary when available. Our claim filing guide provides an evidence index that maps each file to the fact it proves.
Do not create uncontrolled duplicates
Repeatedly uploading the same document under new names can slow review and create version conflict. If a replacement is necessary, label it “corrected” or “supersedes,” identify the earlier filename and date, and state exactly what changed.
Use our original document and version guide to distinguish source, working copy, redacted copy, translation, correction, and final submission.
Obtain a durable submission receipt
Save the claim number, confirmation number, upload timestamp, filename list, document categories, page counts where shown, and portal message. An email saying only “we received your message” may not confirm the attachments.
Allianz’s U.S. filing guidance recommends choosing the device that makes document upload practical. Its separate delay guidance notes that fax and mail can also be available and recommends putting the policy number on documents so they can be tracked.
Verify readability after submission
If the portal permits download, reopen representative files. Otherwise ask the claims team to confirm filenames, page counts, and readability—not to decide coverage prematurely. Record which requested items are marked received, deficient, or still missing.
A successful transfer can still produce a corrupted, blank, rotated, truncated, or misindexed file. Resolve the defect with one controlled replacement.
Use an approved alternate channel
Ask whether secure email, fax, postal copies, a mobile app, agent upload, or a fresh link is authorized. Confirm recipient, subject-line format, claim identifier, file limits, encryption, and receipt method. Never use an address copied from an unverified forum.
If physical documents are required, preserve copies and tracking. Do not send irreplaceable originals unless current instructions require them and return handling is confirmed.
Handle expired upload links
Supplemental links can expire or be tied to one request. Do not alter the URL or forward it to an unauthorized person. Ask the administrator to issue a new secure link and restate the document list and deadline.
Check whether the expired link affected only upload access or also closed the claim request. Save the new invitation and final receipt together.
Respond when the portal still says “documents missing”
Send a concise reconciliation table: requested item, submitted filename, submission date, receipt reference, pages, and current portal status. Ask whether the issue is nonreceipt, unreadability, wrong category, insufficient content, or an examiner request for different evidence.
Use our status escalation workflow. Do not simply attach the entire file again without identifying the gap.
Protect privacy during troubleshooting
Limit access to the claimant and authorized representatives. Remove local temporary copies from shared devices, but retain the secured master and submission archive. Verify support identities before screen sharing, and never reveal a password or one-time code.
For suspicious upload or payment messages, follow our claim phishing verification guide.
Portal recovery checklist
- Deadline protected and error documented
- Correct official portal, claim, and benefit selected
- Accepted format, size, pages, and filename confirmed
- Final copy reopened and compared with source
- Small test upload verified before batch
- Every filename mapped in the evidence index
- Confirmation and attachment list saved
- Examiner receipt and readability checked
- Approved alternate channel used if necessary
Bottom line
Treat portal submission as a chain of evidence, not a button click. Preserve the source, create a compliant readable copy, attach it to the correct claim, save a durable receipt, and confirm the examiner can open and classify it. When technology fails, protect the deadline and use only an approved, traceable alternate channel.